
PBR textures explained: base colour, roughness, metalness, normal
September 23, 2026 · 5 min read
What each PBR map does, why the metal/roughness workflow is the common standard, the mistakes that are easy to spot, and how to check every channel in the MeshForge viewer.
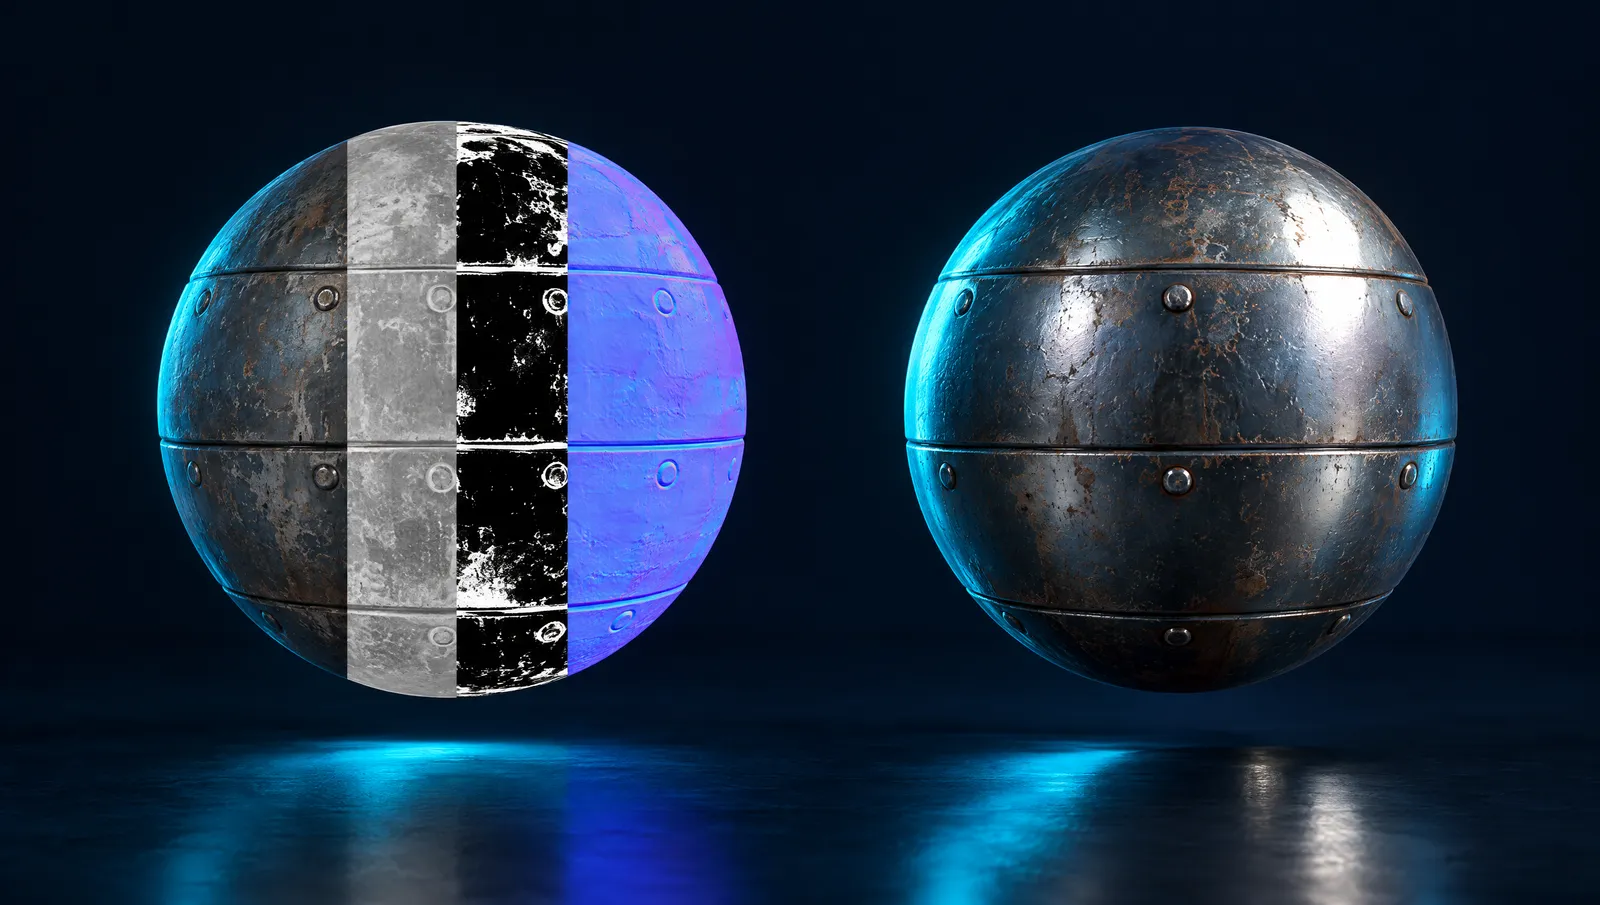
Physically based rendering (PBR) describes a surface with a small set of texture maps that renderers interpret in a consistent way. The same set of maps looks broadly right in a web viewer, a game engine and an offline renderer, because each engine applies the same physical ideas: light is either reflected or absorbed, and a surface cannot reflect more light than it receives.
This guide explains each map in the common metal/roughness workflow, the mistakes that are easy to spot, and how to inspect the maps on a MeshForge model.
Why "physically based"?
Older workflows asked artists to paint the look of lighting into textures: highlights, shadows, reflections. That looked right under one light and wrong under any other. PBR separates what a surface is from how it is lit. The maps describe the material; the renderer adds light.
Two principles from the theory are worth knowing, because they explain most of the rules below:
- Energy conservation. A surface never reflects more light than hits it. Rougher surfaces spread the same light over a wider area, so their highlights are broader and dimmer.
- Fresnel. Every surface reflects more light at grazing angles. Renderers handle this automatically, which is one reason you should not paint reflections into the base colour.
The four maps you will meet most
Base colour
The colour of the surface with no lighting information: no shadows, no highlights, no ambient occlusion baked in. For non-metals it is the diffuse colour; for metals it holds the colour of the reflection (gold is yellow, copper is orange).
Roughness
How blurry reflections are. Black (0.0) is perfectly smooth, like a mirror or polished chrome. White (1.0) is fully rough, like chalk or unfinished wood. Most real surfaces sit somewhere in between, and variation across a surface — fingerprints, worn edges, dust — is what makes a material believable.
Metalness
Whether a pixel is metal. In the metal/roughness workflow the map works mostly as a mask: 0.0 (black) is non-metal, 1.0 (white) is raw metal. Adobe's PBR guide notes that grey values can be used for transitions such as corroded or dirty metal, but a metalness map that is mid-grey everywhere is almost always a mistake.
Normal map
A texture that stores surface direction per pixel. It fakes small geometric detail — seams, scratches, rivets, pores — without extra polygons. Normal maps are why a lightweight, retopologised model can still look detailed.
Other maps you may see
| Map | What it does | When it matters |
|---|---|---|
| Ambient occlusion (AO) | Darkens creases where ambient light is blocked | Adds depth; some engines use it, some compute their own |
| Emissive | Makes parts of the surface glow | Screens, lamps, magic effects |
| Height / displacement | Actually moves geometry, or fakes parallax | Offline rendering and close-up surfaces |
| Opacity / alpha | Transparency | Foliage, glass, fabric edges |
The glTF 2.0 specification defines a metallic-roughness material with base colour, metallic and roughness factors and textures, plus normal, occlusion and emissive textures — which is why GLB files carry a complete PBR material that engines such as Godot and three.js can read directly.
Common problems and how to spot them
| Problem | What it looks like | Likely cause |
|---|---|---|
| Baked shadows in base colour | Dark patches that stay dark under any light | Lighting painted into the albedo |
| Grey metalness everywhere | Everything looks like dull plastic-metal | Metalness not used as a mask |
| Uniform roughness | Surface looks like CG, too clean | No variation in the roughness map |
| Inverted normal map | Bumps look like dents and vice versa | Green channel convention mismatch (OpenGL vs DirectX) |
| Seams in the normal map | Visible lines along UV edges | Texture bleed or tangent mismatch |
The normal-map convention deserves a note: some tools expect the green channel to point "up" (the OpenGL convention, also used by glTF) and some "down" (the DirectX convention). If a normal map looks inverted after import, flipping the green channel in your engine's import settings usually fixes it.
Checking maps in the MeshForge viewer
The MeshForge viewer can show each channel on its own. Switch the view mode from the lit PBR view to:
- Base colour — look for shadows and highlights that should not be there.
- Roughness — dark areas should be glossy, bright areas matte.
- Metalness — bright parts should be the parts that are actually metal.
- Normal map — the baked normal texture itself.
- Wireframe and vertex normals — to check the geometry beneath the textures.
Looking at one channel at a time makes most problems obvious in seconds.
Standard or PBR texturing?
When generating, choose PBR texture when the model is going into a game engine, a real-time viewer or a renderer that understands PBR materials. Standard texture is enough for quick previews and for printing services that only need colour. Higher texture resolutions (HD 4K and EXTREME 8K) are optional and priced per step, shown before you start.
Texture resolution
Higher resolution is not always better. A texture should roughly match how many pixels the model covers on screen. A small prop seen from a distance gains nothing from 8K maps, and each doubling of resolution quadruples memory. As a starting point: standard resolution for props and previews, HD (4K) for hero objects seen up close, EXTREME (8K) for close-up renders and print-quality stills.
Sources & further reading
- The PBR Guide, Part 1: Light and Matter (Adobe) — the theory: energy conservation, microfacets, Fresnel.
- The PBR Guide, Part 2: Practical guidelines (Adobe) — value ranges for metalness and roughness maps.
- LearnOpenGL: PBR Theory — the maths behind PBR shading, written for programmers.
- Khronos glTF 2.0 specification — the metallic-roughness material model used in GLB files.